Documentation
Getting started
Step 1 - Sign up and your first Form
If you haven't already, sign up for an account with us. Once you are logged in, you will land on the "Forms" page with one Form ready to go.
Step 2 - Verify your email addresses
To be able to send you emails, we need to verify the email address on your Account and on each Form. We send you a verification email when you sign up, but if you need to send it again, you can do so from the "Forms" page.
Your email isn't verified
You must verify your email address before we can process any data, please check your inbox and spam folder.Warning
If you can't see messages from Static Contact in your inbox, please check your spam folder - once you flag our emails as not spam they will come into your inbox as expected.
Step 3 - Your first form
On your first Form, click on the button and fill in your desired settings.
Optionally you can also customise and test your form by clicking on the . This is especially useful for checking you have your Captcha or redirect set up correctly and generating a form with little coding knowledge.
Step 4 - Install it on your website
Once you are happy with your Form, clicking on the button will generate your base HTML form ready to be copy and pasted into your website.
You should now have a fully operational form that will now post the forms data directly to your inbox!
Manually
If you wish to build your own form from scratch or make API calls directly, no problem! You can do so using the following url endpoint:
Warning
This endpoint only accepts POST data with the following header types: application/x-www-form-urlencoded or application/json. If you want to send JSON, you will need to enable this from the From edit page.
HTML Example
Warning
Unless you replace our botbuster JS include with another captcha service like Google reCaptcha or hCapture, all posted data will be blocked if it's missing from your form.
Step 5 - Test it out
Boot up your website, fill in your new form and send yourself an email!
Step 6 - Customize it
You can now edit the form however you wish, and if it posts legitimate data, we'll relay this to your inbox or show an error page.
You can also add a custom redirect to a handcrafted thank you page or add recaptcha for extra protection.
Warning
We don't currently support sending of files, so these will not be relayed currently.
Forms page
The forms page is the main page of the application, from here you can view your plan, monthly stats and Forms.
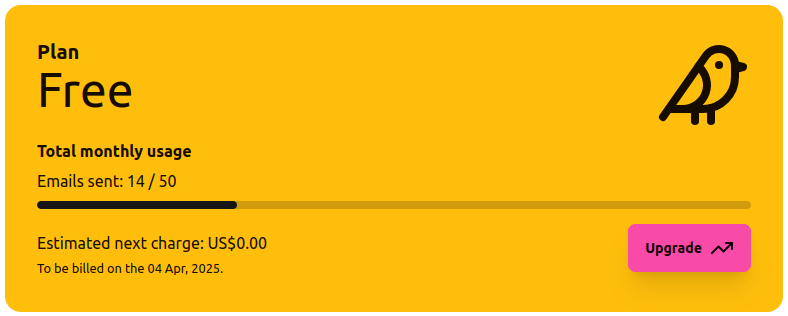
And you can view the Forms you have:
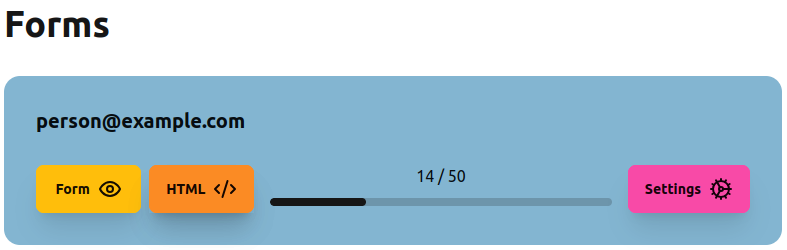
Form builder and testing
From the Form page, you can click on which will load the form builder and testing area for that form.
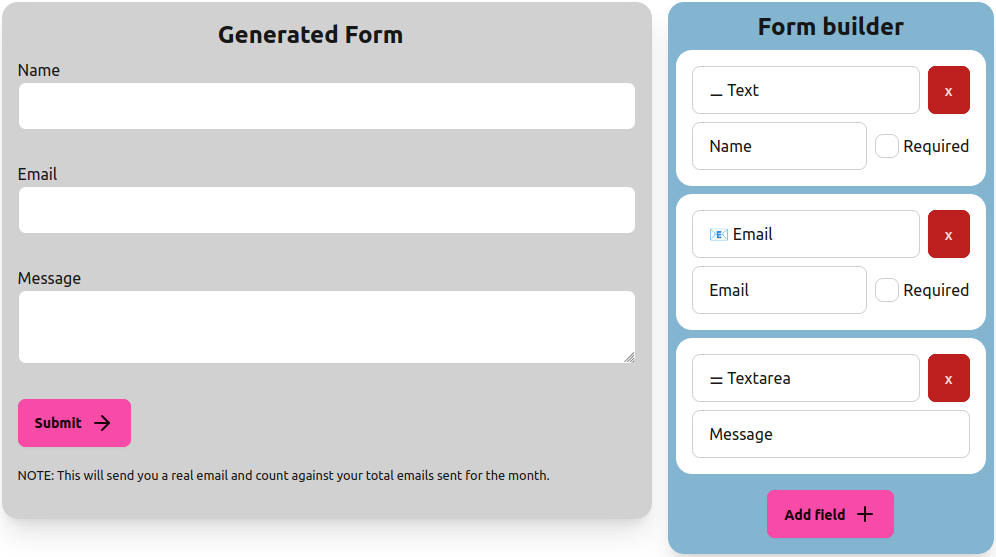
This is a fully operational form, which you can then build out and test.
Once you are happy with the form, click the , bottom right - and then click button on Form which will then generate your customised HTML form for you to easily copy and paste into your website.
Warning
Submitting this form will send you a real email and will count against your total emails sent for the month.HTML Form generator
From the form page, you can click on a Forms to generate your forms HTML for you to copy and paste into anywhere you want to display the form.
Form settings
The following paramaters can be set for each Form by clicking on a Forms button.
Form Name
You can give your form a custom name for ease of managment. Otherwise it will just display the email address that it sends the data to.
Email Address To Send Form Data To
This is where the form will send it's submitted data to. You can changed this at anytime. If you change it to an email address we don't recognise, you'll need to revalidate it before it will work.
Subject line
You can set a custom subject line to the form data email that gets sent to you, so you can easily find it in your inbox.
Return url
If you want to use your own thank you page rather than ours, you can set the return url on a Form to tell our system where to redirect to once a form has been submitted.
For example, if you have a thank you page you have created at https://example.com/thank-you, set a Form Return Url to that url, test the form is redirecting correctly and you're good to go.
Email notifcation subject line
When our system emails you, you will be given a generic email subject line like Static Contact Form submission because we don't know what you are using it for. But it's very likly you will use it for a specific website, so you can change the Form's Email notifcation subject to somethig more relivent - eg: example.com Form submission.
Whitelisting domains
You can easily whitelist domains by adding domains to the Form Whitelist. This will then limit all requests to the domains provided and block any requests that come from other domains.
We check the domain the browser reports the form was submitted from (the Origin or Referer header). Subdomains of a whitelisted domain are allowed automatically, so adding example.com also covers www.example.com. If a visitor's browser or privacy extension strips these headers entirely we won't block the submission, but it does count towards their spam score.
It's a simple and effective way to help limit how your form can be abused but won't stop spam bots submitting the form through your website or spoofing the the request domain so it should always be used with other spam prevention methods, like a captcha solution.
Local development
If you want to be able to test sending emails from localhost, either leave the Whitelist empty, in which case it will accept all requests from all domains, or add 'localhost' to the Whitelist. Just make sure to remove it once development has been completed.
Warning
Ensure to click the after updating a forms settings or nothing will have updated.
Captcha
You can add your captcha site and secret keys here to enable extra protection from unwanted spam.
Simply select the captcha provider you want to add and copy and paste the site and secret keys into the relivant fields.
Allow API calls
Toggles your API on and off. By default, this is turned off.
If you have enabled it, the same end point will now accept and return json.
Example in Javascript:
Warning
Ensure to POST your data and set the header Content-Type to application/json. . Otherwise you're going to have a bad time.
Set up a reCaptcha
Google reCaptcha
Google reCAPTCHA is a free service that protects your site from spam and abuse. It uses advanced risk analysis techniques to tell humans and bots apart.
What you will need
- You will need a google account, sign in or you can create a new account for free.
- Your Google reCaptcha site and secret keys
- Access to the website you want to embed your form into
Get your V3 site and secret keys
Once you have a Google account, you can set up a new reCaptcha site.
Follow their instructions, selecting reCAPTCHA type V3 and make sure you fill in the domains correctly.
Warning
Please make sure to add both your own domain and 'staticcontact.com' to your whitelisted domains.Hit save and you should be presented with your very own reCAPTCHA key and secret.
What to do with your site and secret keys?
You need to copy the keys to Static contact so that we can manage the verification calls with Google on your behalf.
SITE KEY: Your client side, 'Site Key' is for public use only, and will need to be added to your forms submit button to make it work.
From Google Recaptcha, copy your Site Key, then in Static Contact, find the Form you want to add reCaptcha to and click the . Then find and and click the "Captcha" drop down, select Google reCaptcha, and then paste the key into the 'Site Key' field. Now return to the Google recaptcha website to get your Secret Key.
SECRET KEY: Your Secret Key is for back-end code only.
In Google Recaptcha, copy your Secret Key, return to Static Contact and paste the key into the 'Secret Key' field.
Once both fields have your keys in them, click the and test your form by clicking on the to make sure you are getting no errors.
Then simply click the on the same form. This will now generate you a Google reCapthca ready form which you can copy and paste into your website.
Load your website in a browser and you should see the reCaptcha logo load on your site, and your form should now be protected by Google reCaptcha and be relaying through Static contact to your inbox.
Docs
DocumentationExample
Hot tip
Did you know you can hide the recaptcha badge ?
hCaptcha
Solve your fraud and abuse problem today. Instantly detect and deter human and automated threats.
What you will need
- You will need a hcaptcha account, sign in or you can create a new account for free.
- Your hCaptcha site and secret keys
- Access to the website you want to embed your form into
Get your Site and Secret keys, and what to do with them
SITE KEY: Your client side, 'Site Key' is for public use only, and will need to be added to your form to make it work.
Log into hCaptcha and you will be presented with the hCaptcha Dashboard, look for the "add site" button halfway down the page.
Fill in the form details, making sure to add the correct details.
Warning
Please make sure to add both your own domain and 'staticcontact.com' to your whitelisted domains.You will now see a list of your hCaptcha instances, clicking on one will allow you to get your first 'Site key', which is a unique public ID you use on your site or app.
Copy this key and head back to Static Contact, find the Form you want to add hCaptcha to and click the . Then find and select 'hCaptcha' from the 'Captcha' dropdown, paste your Site Key into the 'Site Key' field.
SECRET KEY: Your server side, 'Secret Key' is backend use only, and will need to be added to your Static Contact Form to make it work.
In hCaptcha, click on your profile icon, top right, and select 'Settings'.
Your top item should be an account level secret - generate one if you don't have one already, and copy the code.
In Static Contact and paste the 'Secret key' into the matching 'Secret key' field.
Click and test your form by clicking on the to make sure you are getting no errors.
Once you are happy with it, simply click the on the same form. This will now generate you a hCaptcha ready form which you can copy and paste into your website.
Load your website in a browser and you should see hCaptcha load on your site's form, which should now be protected by hCaptcha.
Docs
DocumentationExample
Cloudflare Turnstile
A verification tool to replace CAPTCHAs
What you will need
- You will need a Cloudflare account, sign in or you can create a new account for free.
- Your Turnstile site and secret keys
- Access to the website you want to embed your form into
Get your Site and Secret keys, and what to do with them
Once you have signed up or logged into your account
- Click the "Turnstile" like from the left hand menu.
- Click on "Add widget"
- Give it a name, like your website address (eg: example.com)
- Click on "Add host names", this will bring up an overlay where you can add urls to whitelist
- Add your own domain name (eg: example.com) and staticcontact (ie: staticcontact.com)
- Click "Add" down the bottom to save these into the Widget
- Select a Widget mode
- Click on "Create"
You will now be presented with your Site key and Secret key.
Warning
Please make sure to add both your own domain and 'staticcontact.com' to your whitelisted domains.SITE KEY: Your client side, 'Site Key' is for public use only, and will need to be added to your form to make it work.
Copy this key and go to Static Contact in a different browser tab or window. Find the Form you want to add turnstile to and click the . Then find and select 'Cloudflare Turnstile' from the 'Captcha' dropdown. Paste your Site Key into the 'Site Key' field.
SECRET KEY: Your server side, 'Secret Key' is backend use only, and will need to be added to your Static Contact Form to make it work.
Head back to your Turnstile page, copy the Secret key and paste the 'Secret key' into the matching 'Secret key' field in Static Contact.
Click and test your form by clicking on the to make sure you are getting no errors.
Once you are happy with it, simply click the on the same form. This will now generate you a Turnstile ready form which you can copy and paste into your website.
Load your website in a browser and you should see Turnstile load on your site's form, which should now be protected by Turnstile.
Docs
DocumentationExample
Static Site Generators
Static Contact was built to work seamlessly with static sites, making HTML forms a breeze to work with without the need for a full blown back-end or hosting solution.
Hot tip
Did you know you can host static sites for FREE with Github pages
Hugo
The world's fastest framework for building websites.
Integrating Static Contact into Hugo is simple and straightforward!
You can follow thier instructions to Get started and set up your website.
Once you have your website up and running, generate a Static Contact Form, copy and paste the HTML snippet into your website and your good to go.
Here's a contact form example for Hugo.